🛠️POCUS Skills
After reading this section, you should be able to:
- ✅Pick the correct POCUS probe and the correct preset for ultrasound-guided IV access.
- ✅Apply basic probe manipulation and image optimization skills to facilitate visualisation.
- ✅Identify the sonographic appearence and characteristics of structures one may encounter during cannulation.
🙋What is POCUS?
- POCUS stands for Point-of-Care Ultrasound. In contrast to a comprehensive ultrasound machine, a POCUS device is simpler, more portable and generate less image details. It is designed for rapid assessments and simple bedside procedures rather than formal diagnostic investigations.
- To use a POCUS device for IV access, you should use the linear probe. A linear probe is the one with a flat and long surface, other common transducers on POCUS devices are curvilinear transducers and phased array transducers.
- A linear probe is a high-frequency probe (5 to 12 MHz), offering high resolution image with low penetratraing power. It is designed to look at superficial structures, particularly useful for vascular access, peripheral nerve block and musucloskeletal ultrasound.
🎛️Knobology
- Knobology means the study and application of an ultrasound machine’s controls (the “knobs”) to optimize image quality and diagnostic accuracy.
- In POCUS, there are no physical knobs but it is still essential to know the basic skills to optimise the image for the best results.
- Refer to the users manual or cheatsheet of your POCUS device to learn about the controls.
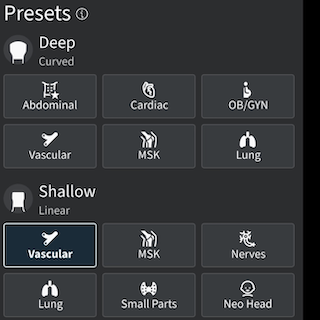
- PRESET
- Select the vascular or musculoskeletal preset in the POCUS application to enhance the image quality of superficial soft tissue and blood vessels.
- The preset settings are usually good enough, further tweaking may not be necessary.
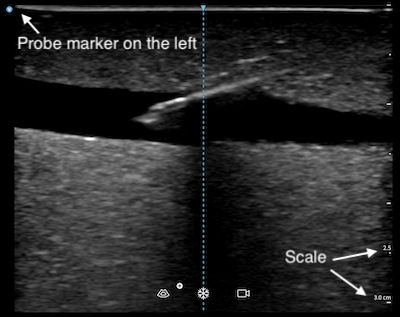
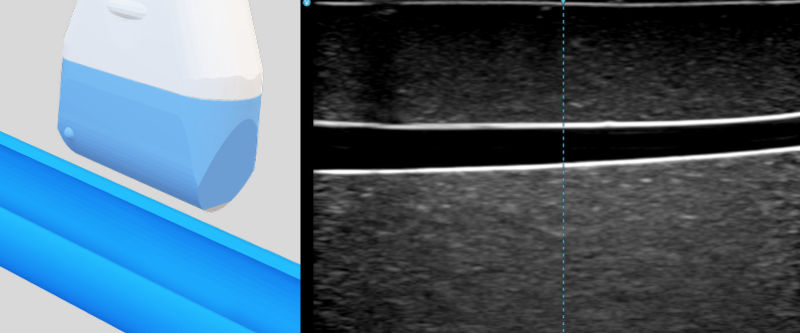
- You should also enable the center marker in the POCUS application, if available.
- DEPTH
- Adjust the depth of the ultrasound image so the target vessel appears in the centre of the screen.
- If the view is too shallow, posterior structure may not be seen well. If the view is too deep, the vessel and the needle will appear too small on screen, making precise tracking difficult.
- The depth is shown in centimetre (or other units as specified) on the scale located on the right side of the screen. You can also use that as a reference to estimate dimensions of the structures you scanned.
- GAIN
- Adjust the gain so structures appear as they should. The brightness of structures depends on the amplitude of ultrasound waves they reflect back to the transducer.
- Normally fluid (blood) should appear black (anechoic), and tissue should be gray. Highly reflective surfaces (bone, air bubble, metal needle) appears as a bright line (echogenic) with black signal posterior to it (acoustic shadowing) because soundwaves cannot go through it.
- An inappropriate gain setting would result in poor image contrast, masking the needle tip or create image artifacts.
- FOCUS
- Position the focal zone at the level of the target vessel.
- This zone is the depth where the ultrasound beams concentrate, providing the highest resolution for clearly defining the vessel walls and the needle entry point.
🧭Orientation
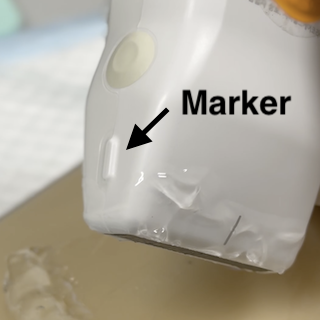
- Conventionally, while using a linear probe with the vascular preset, the image marker would appear on the left side of the screen. You should make sure the physical probe marker, which may be a notch or an embossed dot on the side of the device, is also on the left before scanning. You may confuse yourself with a mirror image if they are not aligned.
- After orientating the probe with the image, you must know the two views for visualising a blood vessel, the short axis and the long axis views.
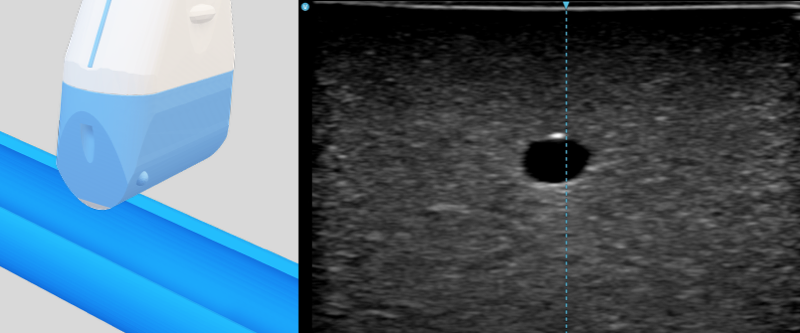
- Short axis (transverse) view: The probe is perpendicular to the travelling direction of the vessel. The vessel appears as a black circle. It is easier for lateral alignment and identification of adjacent structure, but the needle only appears as a dot.
- Long axis (longitudinal) view: The probe is parallel to the travelling direction of the vessel. The vessel appears as a long pipe. It enables full visualization of the needle shaft and tip, but requires precise alignment with the vessel and needle.
✍️Probe Manipulation
Use your non-dominant hand to hold the ultrasound probe. The dominant hand is reserved for cannualation. There are various grip used for ultrasound scanning. For IV access, the pencil grip is ideal since it is stable and allow fine adjustments.
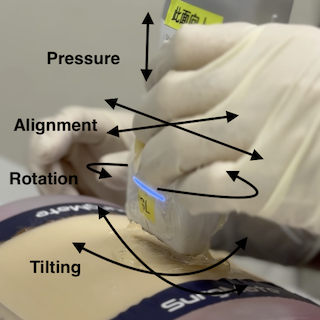
PART (Pressure, Alignment/Sliding, Rotation and Tilting/Fanning) are the four essential maneuver for visualision of a blood vessel.
- Pressure: Apply pressure to confirm compressibility of a vessel. Reduce pressure before cannulation so the vein is not collapsed.
- Alignment: Slide the probe along and across the vessel course to move and center the scanning plane with the vessel.
- Rotation: Toggle between short axis and long axis views.
- Tilting: Fan the probe to align the axis of the scanning plane perpendicular to the vessel wall. Ultrasound image is the clearest at 90 degrees. An angulated or off-center view is suboptimal for vascular access.
🦴Structure Identification
Veins and arteries may look similar on ultrasound. They can be distinguished from each other by looking at some key characteristics. Nerves may not look similar but are important adjacent sturcture that you should avoid.
| Vein | Artery | Nerve | |
|---|---|---|---|
| Shape / Appearande | Ovoid / irregular | Round | Honeycomb-like echogenic bundle |
| Compressibility | Compressible* | Non-compressible | Non-compressible |
| Pulsatility | Non-Pulsatile | Pulsatile | Non-pulsatile |
| Wall | Thin | Thicker and echogenic | Not applicable |
| Size | Generally larger | Generally smaller | Variable |
* Except when a thrombus is present
🎥Demo
Two compressible veins and one incompressible artery were shown in this clip.

The median nerve is shown in this ultrasound clip, presenting as honeycomb like echogenic structure.

🔄Recap
What is the recommended length of catheter for ultrasound guided peripehral IV access?
At least 1.75" (4.5cm) is recommended. That usually means a cannula size of 18G or larger.
For a vessel 0.5cm deep, what is the minimum needle length for?
The estimated length required for cannulation is 4 times the depth of the vessel. For a vessel 0.5cm, the minimum length is 2cm.
What must be optimised to improve the ergonomics when practising ultrasound guided IV access?
The environment lighting, the equipment, the patient and the practitioner’s position and alignment, as well as stability should be optimised for a smooth, successful and risk-free procedure.